Easter Eve our six year old came to me and asked me to take a picture of the Easter Bunny. I told him I'd try and didn't think much more about it until later when I was putting him to bed and he reminded me that I "promised' to take a picture of the Easter Bunny. I think his two older brothers were telling him the Easter Bunny wasn't real and he wanted proof to the contrary. So I began concocting a plan to photograph the Easter Bunny for our six year old.
Showing posts with label Photoshop. Show all posts
Showing posts with label Photoshop. Show all posts
Sunday, April 04, 2010


Saturday, February 20, 2010
The Power of Post Processing
I often run across other photographers who don't use post processing in their workflow and it always strikes me as somewhat odd. Are these people so good that they don't need to use post processing or do they not know how to use Photoshop or other image editing tools? In my opinion, after learning how to use your camera gear and composing an image in your viewfinder, post processing is the most import part of your workflow and it can greatly enhance the visual impact of your images.
Today I was looking through some older photos and I ran across this unprocessed picture of my son at the beach in Destin, Florida. I like the image but there were so many things wrong with it that I decide to run it through Photoshop and see if I could improve it.
There are four major adjustments that I felt needed to be made.
- Level the crooked horizon.
- Remove the two swimmers just above his left hand.
- Remove the blue shovel and pail near his left knee.
- Correct the over exposed sky, clouds, sand and water.

I pulled the original image into Photoshop CS3 and corrected the four problems and also used curves to adjust the colors. here is what i did in Photoshop
- Level the crooked horizon.
Rotated the image 3 degrees clock wise and cropped. I had to use the clone tool to rebuild the far right edge of the image or his left elbow would have been cropped off. - Remove the two swimmers just above his left hand.
A little bit of cloning took care of the swimmers - Remove the blue shovel and pail near his left knee.
A whole lot more cloning took care of the blue shovel and pail. - Correct the over exposed sky, clouds, sand and water.
Added an adjustment layer and set it to multiply to darken the entire image. I then added a layer mask and masked out him and his surf board so they would not be darkened by the adjustment layer. - Added a curves adjustment layer too bring out the color and contrast of the sky and clouds.
The whole process took me about 15 to 20 minutes. I'm pleased with the result but I can see many flaws and I know that I can do better with more practice. Let me know what you think.

All images copyright Daniel Ray Photography.
Friday, October 09, 2009
Photoshop Tip - Merge All Visible Layers
Like most other digital photographers I occasionally use Adobe Photoshop (PS) to edit and enhance my images. I'm always looking for better or faster ways of doing things in PS so as I run across great PS tips I will be sharing them with you guys. So without any further delay here is PS tip #1.
When editing my images in PS I typically create mutliple adjustment layers. As you can see in the image below I have the original (background) image layer, a levels adjustment layer and a curvers adjustment layer.
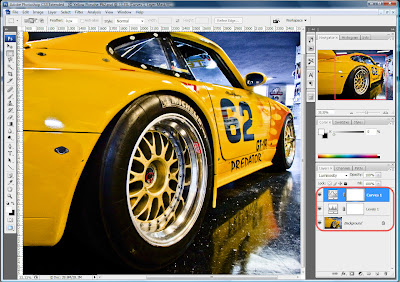
When I finished making adjustments to the image I almost always need to sharpen the entire image using either one of the sharpening filters or by using the High Pass filter (Filter > Other > High Pass...) which is my favorite. In order to apply the sharpening filter to the original image plus all the adjustments the multiple layers must be combined into one layer. This is done my pressing CTRL+ALT+SHIFT+E which will create a new top level layer that is a merge of all visible layers.
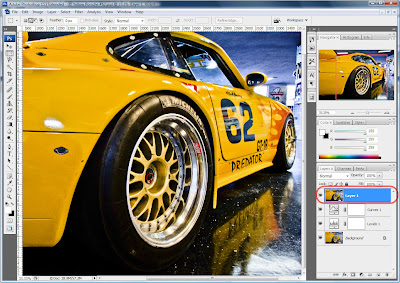 Now you can select the new layer and apply your favorite sharpening filter to the entire image.
When editing my images in PS I typically create mutliple adjustment layers. As you can see in the image below I have the original (background) image layer, a levels adjustment layer and a curvers adjustment layer.

When I finished making adjustments to the image I almost always need to sharpen the entire image using either one of the sharpening filters or by using the High Pass filter (Filter > Other > High Pass...) which is my favorite. In order to apply the sharpening filter to the original image plus all the adjustments the multiple layers must be combined into one layer. This is done my pressing CTRL+ALT+SHIFT+E which will create a new top level layer that is a merge of all visible layers.
Now you can select the new layer and apply your favorite sharpening filter to the entire image. Wednesday, February 04, 2009
Revisit Old Photos to Find Something New
This weekend my primary hard drive was full and I couldn't import any new photos until I did some house cleaning and purged my system of a few gigbytes of bits. So I began by opening Adobe Lightroom and started looking through my many folders and thousands of images trying to decide what could be deleted to free disk space.
After about an hour of browsing and numerous photos removed I came across a series of images from Chirstmas 2007 which were taken shortly after I pruchased my Canon 40D SLR camera. One photo of my son Austin kind of stood out. There was nothing exceptional about it but I just loved it. So I put my house cleaning project on hold, swicthed from the Lightroom Library module into the Develop module and started working on the image in hopes of bringing out the best qualities while hiding the rest.
Below is the orginal RAW image straight out of the camera with no processing. After looking at the image I wanted to draw the viewers attention to his cute little face peeking out from behind the Christmas tree. As you can see the rule of thirds was not used since his face is planted sqaurley in the middle of the image. I also didn't like the group of people seated behind him becuase it was distracing and didn't add to the image. What should I do?
 Original ImageI began by cropping the image to remove as much of the group of people as possible without chopping the top or side of his head. This resulted in a closer view of his face and reveled the typical skin blimishes you'd expect to find on a child. So I grabbed the Spot Removal tool and removed those unsightly spots. I next turned my attendtion to the colors and used the Vibrance slider to pump up a little color and I also lowered the Contract to soften the image. I'm pretty pleased with the end result. What do you think?
 Final Image
After about an hour of browsing and numerous photos removed I came across a series of images from Chirstmas 2007 which were taken shortly after I pruchased my Canon 40D SLR camera. One photo of my son Austin kind of stood out. There was nothing exceptional about it but I just loved it. So I put my house cleaning project on hold, swicthed from the Lightroom Library module into the Develop module and started working on the image in hopes of bringing out the best qualities while hiding the rest.
Below is the orginal RAW image straight out of the camera with no processing. After looking at the image I wanted to draw the viewers attention to his cute little face peeking out from behind the Christmas tree. As you can see the rule of thirds was not used since his face is planted sqaurley in the middle of the image. I also didn't like the group of people seated behind him becuase it was distracing and didn't add to the image. What should I do?
 Original Image
 Final Image
Subscribe to:
Posts (Atom)